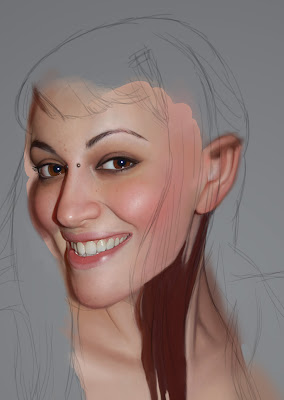


Erf ... Technical masturbation. But I've got a funny idea for the final picture ;)
Some few tricks:
- Always do different layers for each parts (eyes, mouth, skin ...).
- To see if your luminosity and your contrast are good, desaturate your picture and your photo ref.
- Incrustation and colour type layers are very useful for minor changes on your tones
- The "dry brush" ("pinceau à sec" in french, I'm not sure of the translation) is very useful for the skin texture.
8 hrs T_____________T
Next step : the breast ^o^
Freaking WOW!
RépondreSupprimerHo ! Hi Denis, never saw you had a blog ^o^
RépondreSupprimerThx my friend ;)
Impressive. You make that this look easy. I cannot wait for the next step :P
RépondreSupprimerOh my goodness, that's fantastic! <3 You are incredibly good!
RépondreSupprimerEt bin, chapeau !
RépondreSupprimerDu gros boulot tout ça, encore plus poussé que d'hab, ça promet.
Bon courage pour la suite...
(le grain de peau et la pilosité sont extra)
Pour la peau, tu rajoutes du bruit à ton calque ?
Nacho : It's easy ... It's just time consuming :D
RépondreSupprimerELECTRONICRAINBOW : thx a lot :)
Torahn : Non, pour la peau, j'ajoute des petites touches avec le "pinceau à sec", directement avec une opacité très, très faible, 1% généralement :)
Chloé is so beautiful!!!
RépondreSupprimerI think one of the most beautiful women i´ve ever seen.
Of course ! I have good tastes :D
RépondreSupprimerVery, very good! Makes me feel inspired to take more than 3 hours to make my drawings...and inspired to buy a wacom... :D
RépondreSupprimerLove your stuff.
Wow! dats very inspiring!!! Luv ur style :)
RépondreSupprimeromg, this is really amazing, I really love to see your step by step...and it's an interesting coincidence to see that you and Daniela Uhlig did the same portarit (both versiones are different but amazing of course)! :D
RépondreSupprimerLovely :)
RépondreSupprimerClaudia : Yes, I saw Daniela's version :D
RépondreSupprimerI know Daniela like my wife's face ^o^
oO Excellent travail méticuleux et de patience !!!
RépondreSupprimerJ'ai deux petites questions méthodologiques, la photo de base tu t'en sert pendant tout ton travail (par ex pour contrôler les valeurs chromatiques) ou pas ? et elle se trouve sur un calque ou sur le coté pour l'avoir toujours de visu ?
Je l'ai à côté. Je la désature ainsi que mon gribouille fréquemment pour comparer la luminosité et le contraste ^^
RépondreSupprimerImpressive...
RépondreSupprimerIm amazed by how cool the "grain and freckles" effect is, it relly makes the skin breathe!
I was a bit lucky ;)
RépondreSupprimerI did several tests with different brushes in different types of layers. It looks a little bit crap on very big size, but I think it works well :)
Thx Paco ^^
Superbe !!
RépondreSupprimerPlus vrai que vrai :D
Rooh t'es trop fort !!
RépondreSupprimerWork Wise, Serge (comme vos autres). J'aime le ton que vous laissez la peau et les palettes de couleurs "sombre et dense." Tu prends la moitié que moi pour le peintre (!). Dans quelle résolution travaillez-vous? Moi, original à 300 dpi, 60x40 cm environ Ps.
RépondreSupprimerSuper!
RépondreSupprimerSerge you are a magician!!
Charles : 10000 x 7000 px, 300 dpi too :)
RépondreSupprimerAksPhone : no, I'm just patient (at least fo painting ^^).
ça a du etre un sacré boulot !
RépondreSupprimer...that...is...amazing...I hope someday I'll be able to do work like this. =3
RépondreSupprimerBeau travail serge, j'ai hâte de voir la partie sur les cheveux ! Donc tu conseilles de travailler en opacité 5% maxi ?
RépondreSupprimerTu dis 10000*7000px en 300dpi, quand tu commences ton croquis tu zoom à quelle pourcentage de ta feuille 50% 100% 400% ?
prévois tu de faire une vidéo HD commentée un de ces jours ?
merci !